I believe a lot of Windows 7 (and Windows Vista) users have used Sticky Note gadget at least once. For those that like to use it or depend on it very often, the sad news is the later version of Windows 7 does not include Sticky Note. This happen to me as well. My first Win7 OS does has Sticky Note, and it did save some tree from some forest on this Earth. However when I got my new laptop, it is a more matured Win7, but Sticky Note disappear from the gadgets. Did Microsoft want to destroy more tree? I don't know.
Anyway, I found this freeware, or free apps which more people call it that way on every single software (except OS). This apps is Stickies.
pix credit:http://www.zhornsoftware.co.uk/stickies/
Not only this Stickies does the same thing that the Sticky Note does, but better [my comment in square bracket]:
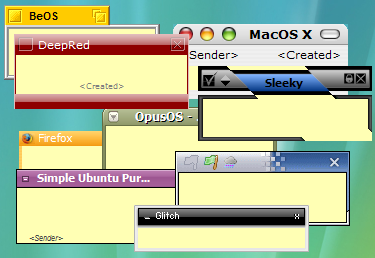
1. Stickies appearance can be customized for fonts, colors. Buttons may be changed, and styles can be saved [reduce boredom]
pix credit:http://www.zhornsoftware.co.uk/stickies/
2. Stickies can store text or images [yea, don't think original Sticky Note can store picture]
3. Stickies can snap to each other and to the sides of the screen to keep them neatly lined up [tidiness?]
4. Stickies can be attached to a web site, document or folder so they only show when it's on screen [I like this feature very much and it make sense!]
5. Stickies can be transferred from one machine to another either over a TCP/IP network connection, or by using an SMTP mail server or MAPI client. [okay, you have to do this for 1001 stick notes? otherwise who would need to do this]
6. Stickies can be hidden for a certain period, until a specified date and time, or to wake every day, week or month, to act as reminders [stick note the can remind me at the right time, nice!]
7. Stickies can have alarms set to ensure you notice them at a point you choose [nice!]
8. Free [yes!!!!!!]
To download Stickies:
http://www.zhornsoftware.co.uk/stickies/download.html
To download more skins for Stickies, go to:
http://www.zhornsoftware.co.uk/stickies/skins/search.pl
If you prefer portable version, here you go:
http://portableapps.com/apps/office/stickies_portable
Like this if you are FB user and you think this post is useful. The button is at top right of content of this post.
+1 this post if you are Google+ users and you think this post is useful.
Hope you will enjoy this post, subscribe to my RSS or mailing list or follow me on blogger or twitter. :)
source: Internet!
Update every month from http://outdatedpenanguncle.blogspot.com/
Outdated Penang Uncle
Showing posts with label Windows 7. Show all posts
Friday, July 27, 2012
Sunday, March 18, 2012
Windows Explorer that Remembers
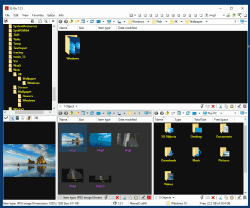
I did post about Explorer++ which become my favorite Windows Explorer. However, recently I have change my mind. Sorry Explorer++, not because you are not nice, but I have found other Windows Explorer that meet my needs. I like to open many windows, not only multiple of tabs in Chrome or FireFox, but Windows Explorer as well. There are a few Windows Explorer replacement that has multi tabs, but I don't think all of them can match Q-dir.
Q-dir not only allow up to 4 windows within the same windows, but I can open many more tabs in each windows. Best of all, I can save the state, so that after a Windows reboot, I can quickly recover my works, without need to look into the paths.
Usually after reboot, we have to open Windows Explorer, click on my documents and then search and search and search, which is very troublesome. With Q-dir, I just need to reload the previous state and it will open back all the windows and tabs and at the paths when I saved it.
Another advantage of the save state feature is I can upgrade Q-dir whenever I feel like to do it. Just save state and then upgrade, open the new version and load state again. I can quickly go back to business.
Why I like to open so many windows? Because I can quickly go back to my manga or music or movie or documents or anything, without need to navigate through the paths all over again. It will be there as long as I save the state.
Q-dir is freeware and now it also support Windows 8. Another thing I like about Q-dir is it available as portable from the official website.
There is one bug however. When I switch between "Restore down" or "Maximum", then windows does not refresh, sometime I don't see some of the files. But I can press Alt+F11 to restart it, it will remember the state before restart. So I don't need to worry too much of losing the paths/windows/tabs.
To download Q-dir, go to this link:
http://www.softwareok.com/?Download=Q-Dir
There is options on 32/64 bits and installer or portable. Personally I use 64bits portable version.
Like this if you are FB user and you think this post is useful. The button is at top right of content of this post.
+1 this post if you are Google+ users and you think this post is useful.
Hope you will enjoy this post, subscribe to my RSS or mailing list or follow me on blogger or twitter. :)
pix source: http://www.softwareok.com
Q-dir not only allow up to 4 windows within the same windows, but I can open many more tabs in each windows. Best of all, I can save the state, so that after a Windows reboot, I can quickly recover my works, without need to look into the paths.
Usually after reboot, we have to open Windows Explorer, click on my documents and then search and search and search, which is very troublesome. With Q-dir, I just need to reload the previous state and it will open back all the windows and tabs and at the paths when I saved it.
Another advantage of the save state feature is I can upgrade Q-dir whenever I feel like to do it. Just save state and then upgrade, open the new version and load state again. I can quickly go back to business.
Why I like to open so many windows? Because I can quickly go back to my manga or music or movie or documents or anything, without need to navigate through the paths all over again. It will be there as long as I save the state.
Q-dir is freeware and now it also support Windows 8. Another thing I like about Q-dir is it available as portable from the official website.
There is one bug however. When I switch between "Restore down" or "Maximum", then windows does not refresh, sometime I don't see some of the files. But I can press Alt+F11 to restart it, it will remember the state before restart. So I don't need to worry too much of losing the paths/windows/tabs.
To download Q-dir, go to this link:
http://www.softwareok.com/?Download=Q-Dir
There is options on 32/64 bits and installer or portable. Personally I use 64bits portable version.
Like this if you are FB user and you think this post is useful. The button is at top right of content of this post.
+1 this post if you are Google+ users and you think this post is useful.
Hope you will enjoy this post, subscribe to my RSS or mailing list or follow me on blogger or twitter. :)
pix source: http://www.softwareok.com
Saturday, March 17, 2012
How to Recover or Repair Windows 7 Aero Feature
At the other day, I was working with many windows, and suddenly my laptop screen just flash and flick and flash again and the Aero features gone and I get the basic Windows 7 colors. When I say "many windows", I really mean it:
So to recover the Aero feature on Windows 7, I tried all the methods that recommended by famous websites and forums, I listed them here so that you can try your luck first with this list:
All above and many others steps I tried, but all of didn't work for me, so final step and the best one I would think:
1. Save all the works
2. Close all the windows
3. Restart
Yes, after restart Windows 7, everything back to normal with Aero feature.
Next time when I see this problem, I will just go for a restart, it could be much much faster than trying out all the methods listed above. :-)
Like this if you are FB user and you think this post is useful. The button is at top right of content of this post.
+1 this post if you are Google+ users and you think this post is useful.
Hope you will enjoy this post, subscribe to my RSS or mailing list or follow me on blogger or twitter. :)
source: I wrote this with research on google, heheh
- 3 Windows Explorer windows
- one X2 Windows Explorer
- one Q-Dir Windows Explorer
- MS Outlook with 5 or more emails opened
- one notepad
- IE with 5 tabs opened
- Chrome with about 70 tabs [crazy]
- FireFox with 3 tabs and Scrapbook is download a page
- MS OneNote
- MS Powerpoint
- MS Words with 3 words documents opened
- Windows Live Messenger
- and other windows that I can't recall
So to recover the Aero feature on Windows 7, I tried all the methods that recommended by famous websites and forums, I listed them here so that you can try your luck first with this list:
- Method 1: Click Windows button and type "Aero" in "Search programs and files" box, click on "Find and fix problems with transparency and otehr visual effects", click "yes" for permission, click "next" to let it troubleshoot and fix the problem. It should fix whatever problem it can find. [however this don't fix my problem]
- Method 2: Refresh Index Score, select a high-contrast theme and then select your previously saved theme that has Aero [this don't fix my problem]
- Method 3: Restart Desktop Windows Manager by execute these 2 lines in command prompt (with admin permission) [this don't fix my problem]
- net stop uxsms
- net start uxsms
- Method 4: Control Panel > System > Advanced system settings > Performance > Settings > Visual Effects. Choose the "Adjust for best performance", wait for it to change the windows style and then choose "Adjust for best appearance" and wait for it again. [this don't fix my problem]
All above and many others steps I tried, but all of didn't work for me, so final step and the best one I would think:
1. Save all the works
2. Close all the windows
3. Restart
Yes, after restart Windows 7, everything back to normal with Aero feature.
Next time when I see this problem, I will just go for a restart, it could be much much faster than trying out all the methods listed above. :-)
Like this if you are FB user and you think this post is useful. The button is at top right of content of this post.
+1 this post if you are Google+ users and you think this post is useful.
Hope you will enjoy this post, subscribe to my RSS or mailing list or follow me on blogger or twitter. :)
source: I wrote this with research on google, heheh
Friday, March 9, 2012
Get To Know Your Computer Better
No, it is not a date. You will not go out to movie and restaurant or jogging or hiking with your computer to know your computer better.
All you need is Speccy free version.
What went well?
1. While CPUz only give you the hardware information, Speccy give you even more detail of the hardware
2. While "System Information" on Windows give you the geeky information, Speccy can give you even more. (I really don't give the damn about Conflicts or DMA or IRQs information anyway)
3. It is free.
4. Portable version available from the official website (Portable version from unknown source could be dangerous!)
5. Made by the same company that created CCleaner.
6. Save the result into XML or text file.
I downloaded the portable version (link at end of post) and give it a try. It take a while to grab all the data, probably 1/2 minutes or more.

The summary is quite simple, just showing the type of OS, CPU, RAM, Motherboards, etc. The CPU temperature is being update on the fly.

Click on the items on left column or the blue color link on right column will give you more detail, I mean the really in-depth details.
One thing that catch my attention, is the Uptime and Downtime. The longest Uptime I ever have on my laptop is more than 20days, meaning I never ever reboot the laptop for more than 20 days! That is what I like about Sandy Bridge with Windows 7, I don't need to reboot so often compare to older version of Windows. All I need to do is either put it to sleep or hibernate mode.

Of course you can buy the Home or Business edition, which will cost US$19.95 and US$34.95, but I don't think it is necessary for normal usage since the information from free version is way too much already.
Download installation version:
http://www.piriform.com/speccy/download/standard
Download portable version:
http://www.piriform.com/speccy/download/portable
Like this if you are FB user and you think this post is useful. The button is at top right of content of this post.
+1 this post if you are Google+ users and you think this post is useful.
Hope you will enjoy this post, subscribe to my RSS or mailing list or follow me on blogger or twitter. :)
source: I wrote this!
All you need is Speccy free version.
What went well?
1. While CPUz only give you the hardware information, Speccy give you even more detail of the hardware
2. While "System Information" on Windows give you the geeky information, Speccy can give you even more. (I really don't give the damn about Conflicts or DMA or IRQs information anyway)
3. It is free.
4. Portable version available from the official website (Portable version from unknown source could be dangerous!)
5. Made by the same company that created CCleaner.
6. Save the result into XML or text file.
I downloaded the portable version (link at end of post) and give it a try. It take a while to grab all the data, probably 1/2 minutes or more.
The summary is quite simple, just showing the type of OS, CPU, RAM, Motherboards, etc. The CPU temperature is being update on the fly.
Click on the items on left column or the blue color link on right column will give you more detail, I mean the really in-depth details.
One thing that catch my attention, is the Uptime and Downtime. The longest Uptime I ever have on my laptop is more than 20days, meaning I never ever reboot the laptop for more than 20 days! That is what I like about Sandy Bridge with Windows 7, I don't need to reboot so often compare to older version of Windows. All I need to do is either put it to sleep or hibernate mode.
Of course you can buy the Home or Business edition, which will cost US$19.95 and US$34.95, but I don't think it is necessary for normal usage since the information from free version is way too much already.
Download installation version:
http://www.piriform.com/speccy/download/standard
Download portable version:
http://www.piriform.com/speccy/download/portable
Like this if you are FB user and you think this post is useful. The button is at top right of content of this post.
+1 this post if you are Google+ users and you think this post is useful.
Hope you will enjoy this post, subscribe to my RSS or mailing list or follow me on blogger or twitter. :)
source: I wrote this!
Saturday, March 3, 2012
Reset Windows 7 without re-install Windows 7
Usually for home users, the best way to fix the problematic Windows is to format the hard disk and re-install everything, all over again. Good that you will get the brand new PC/laptop feel after all steps are down. Bad is too much time wasted.
As for corporate users, the IT usually tell you to re-build the system, which is a nicer term for format and re-install. Well, they might use same imaging software to duplicate the hard image since corporate PCs are always standard build. But it take times to recover all your emails and other stuffs.
How to avoid all these? Use RefreshPC to recover everything back to default setting, safely, claimed by the author of the software, not me. heheh.
Here is what it is written on the website:
RefreshPC is a very easy to use and safe utility for fixing misconfigurations in your services and in the registry itself.
RefreshPC will do the following:
Reduce errors in the Event Viewer
Fix service misconfigurations that may be causing problems including slow boots.
Clean your temporary folders.
Reset key registry entries back to their default values.
The best part is it is Freeware.
RefreshPC works on Windows XP, Windows Vista and Windows 7. 64bit and 32bit versions.
Yes, I read that, FREE. Anyway, I don't have a problem on my Windows 7, yet, so I have not try it. However, if you decided to for the format and re-install thing, why not give this a try before doing the format and re-install. If it still bad, just go ahead with format; but if it is fixed, you save a lot of time!
Like this if you are FB user and you think this post is useful. The button is at top right of content of this post.
+1 this post if you are Google+ users and you think this post is useful.
Hope you will enjoy this post, subscribe to my RSS or mailing list or follow me on blogger or twitter. :)
source: originally saw at http://www.portablesoft.org/refreshpc-portable/
pix source: http://www.xp-smoker.com
As for corporate users, the IT usually tell you to re-build the system, which is a nicer term for format and re-install. Well, they might use same imaging software to duplicate the hard image since corporate PCs are always standard build. But it take times to recover all your emails and other stuffs.
How to avoid all these? Use RefreshPC to recover everything back to default setting, safely, claimed by the author of the software, not me. heheh.
Here is what it is written on the website:
RefreshPC is a very easy to use and safe utility for fixing misconfigurations in your services and in the registry itself.
RefreshPC will do the following:
Reduce errors in the Event Viewer
Fix service misconfigurations that may be causing problems including slow boots.
Clean your temporary folders.
Reset key registry entries back to their default values.
The best part is it is Freeware.
RefreshPC works on Windows XP, Windows Vista and Windows 7. 64bit and 32bit versions.
Yes, I read that, FREE. Anyway, I don't have a problem on my Windows 7, yet, so I have not try it. However, if you decided to for the format and re-install thing, why not give this a try before doing the format and re-install. If it still bad, just go ahead with format; but if it is fixed, you save a lot of time!
Like this if you are FB user and you think this post is useful. The button is at top right of content of this post.
+1 this post if you are Google+ users and you think this post is useful.
Hope you will enjoy this post, subscribe to my RSS or mailing list or follow me on blogger or twitter. :)
source: originally saw at http://www.portablesoft.org/refreshpc-portable/
pix source: http://www.xp-smoker.com
Friday, January 13, 2012
Windows7 flaw or network driver error?
Something wrong with my network card or Windows 7 or network driver.
Sometime I like to check Task Manager just to make sure my network is working. Or at least to make sure I am fully utilizing the broadband unlimited download. Even though it is a very slow broadband, 512k, yes, not even 1M, but at full speed, theoretically I can download 5G plus of files in one full day. Of course it is not always that case, but nevertheless, usually I can get about 3 to 4G of download in just 24 hours.
At one of the night recently, I was doing my usual habit (after I offline), but found out there are a long list of numbers in the Task Manager's Networking tab. See picture:

Don't get it? Let me zoom in:

Get it? No photoshop being use here, it is being cut from print screen only using IrfanView.
By looking at the above pictures, and assume Windows 7 or the network driver didn't go cockoo, there has been ? Of xxxByte going thru the network card. Here is the calculation:
Bytes Sent or Bytes Received (about the same, I round up the last 9 numbers of least significant numbers)
= 18,446,744,073,000000000
18446744073000000000/1024=18014398508789.0625 kilobytes (KB)
18014398508789.0625/1024=17592186043.74 megabytes (MB) [round up the decimal to 2 digits only]
17592186043.74/1024=17179869.18 gigabytes (GB) [round up the decimal to 2 digits only]
17179869.18/1024=16777.21 terabytes (TB) [round up the decimal to 2 digits only]
16777.21/1024=16.38 petabytes (PT) [round up the decimal to 2 digits only]
16.38 petabytes of data has been flow in and out through the network card, how is that possible?
Is that possible? I would think it is just Windows 7 flaw or driver problem. What do you think?
Have you seen this before on your PC?
Like this if you are FB user and you think this post is useful. The button is at top right of content of this post.
+1 this post if you are Google+ users and you think this post is useful.
Hope you will enjoy this post, subscribe to my RSS or mailing list or follow me on blogger or twitter. :)
source: I wrote this!
Sometime I like to check Task Manager just to make sure my network is working. Or at least to make sure I am fully utilizing the broadband unlimited download. Even though it is a very slow broadband, 512k, yes, not even 1M, but at full speed, theoretically I can download 5G plus of files in one full day. Of course it is not always that case, but nevertheless, usually I can get about 3 to 4G of download in just 24 hours.
At one of the night recently, I was doing my usual habit (after I offline), but found out there are a long list of numbers in the Task Manager's Networking tab. See picture:
Don't get it? Let me zoom in:
Get it? No photoshop being use here, it is being cut from print screen only using IrfanView.
By looking at the above pictures, and assume Windows 7 or the network driver didn't go cockoo, there has been ? Of xxxByte going thru the network card. Here is the calculation:
Bytes Sent or Bytes Received (about the same, I round up the last 9 numbers of least significant numbers)
= 18,446,744,073,000000000
18446744073000000000/1024=18014398508789.0625 kilobytes (KB)
18014398508789.0625/1024=17592186043.74 megabytes (MB) [round up the decimal to 2 digits only]
17592186043.74/1024=17179869.18 gigabytes (GB) [round up the decimal to 2 digits only]
17179869.18/1024=16777.21 terabytes (TB) [round up the decimal to 2 digits only]
16777.21/1024=16.38 petabytes (PT) [round up the decimal to 2 digits only]
16.38 petabytes of data has been flow in and out through the network card, how is that possible?
Is that possible? I would think it is just Windows 7 flaw or driver problem. What do you think?
Have you seen this before on your PC?
Like this if you are FB user and you think this post is useful. The button is at top right of content of this post.
+1 this post if you are Google+ users and you think this post is useful.
Hope you will enjoy this post, subscribe to my RSS or mailing list or follow me on blogger or twitter. :)
source: I wrote this!
Wednesday, January 11, 2012
BlueStacks on Windows 8
These few days a lot of tech companies have been busy showing off their latest and concept gadgets at CES 2012 at Las Vegas. BlueStacks is one of them. They are showing off BlueStacks on Windows 8. The promo video below showed that after a new android apps being install on BlueStacks on Windows 8, an shortcut will appear automatically on the metro GUI.
BlueStacks for Windows8 will be available in Feb 2012. While waiting for that, why not install BlueStacks on your Windows 7 now and enjoy many Android apps on Windows 7, see see posts on how to do it:
How to install apk into BlueStacks
Rearrange apps list on BlueStacks
How to enable Android Market for BlueStacks
Like this if you are FB user and you think this post is useful. The button is at top right of content of this post.
+1 this post if you are Google+ users and you think this post is useful.
Hope you will enjoy this post, subscribe to my RSS or mailing list or follow me on blogger or twitter. :)
source: saw this video on youtube
BlueStacks for Windows8 will be available in Feb 2012. While waiting for that, why not install BlueStacks on your Windows 7 now and enjoy many Android apps on Windows 7, see see posts on how to do it:
How to install apk into BlueStacks
Rearrange apps list on BlueStacks
How to enable Android Market for BlueStacks
Like this if you are FB user and you think this post is useful. The button is at top right of content of this post.
+1 this post if you are Google+ users and you think this post is useful.
Hope you will enjoy this post, subscribe to my RSS or mailing list or follow me on blogger or twitter. :)
source: saw this video on youtube
Tuesday, December 27, 2011
How to run Windows XP programs in Windows 7?
If you have programs (or we call them apps nowadays, thanks to Apple) that runs only on Windows XP and will not run on Windows 7 at all. Even you tried to execute the program by setting "Compatibility" (in properties) to run as Windows XP, the program will stubbornly not run at all. It is time to install a virtual PC on your Windows 7.
There are other methods to allow you to run the native Windows XP program:
1. Install Windows XP and Windows 7, and make the PC dual boot - Windows XP and Windows 7 co-exist on same system. However this will create quite a messy files system and I am not sure will it works.
2. You can also install virtual box on Windows 7 and then install the Windows XP. However you will need the original setup CD of Windows XP. Who would ever keep the Windows XP setup CD?
3. Buy a second hand system that come with Windows XP. Or install Windows XP on the old system, but need the original Windows XP setup CD as well.
Microsoft is kind enough to provide this Windows XP virtual [read: MS is not always so generous, okay]. Here are what to do:
1. Go to the virtual pc website of MS
http://www.microsoft.com/windows/virtual-pc/download.aspx
2. Choose to download for Windows XP virtual pc.
3. The website will need to verify if your Windows 7 is a legitimate, you will need to allow the download and execute this file "WindowsActivationUpdate.exe". I have to use IE to do this, using Chrome to download and execute taking forever (Probably MS purposely make it that way?).
4. After verification, it will bring you to the actual download page. There are 4 steps to follow, first step is to save that web page or print it for reference. I skipped the first step and jump to step 2 to step 4. :P
5. There are 3 files to download:
7. After restart your PC, time to run Windows XP virtual PC for first time.
a. Start -> All Programs -> Windows Virtual PC -> Windows XP Mode
8. You will have to wait a while for the first time because it will install the Windows XP.
a. Key in a password for the Windows XP virtual PC when it ask for it. Not needed to be same with your Windows 7 password.
9. After Windows XP boot up in virtual PC, you will able to see this. Note the BlueStacks gadget next to it. :D

10. The C drive and D drive in this virtual PC is not the same one on your Windows 7. They are virtual disk on this virtual PC. However your actual disks on Windows 7 should be link as a network disk in the virtual PC.
11. Go ahead and install the programs that you want to use in Windows 7.
Things to note: there are no shutdown option in this virtual Windows XP. Click on "Ctrl+Alt+Del" on the virtual PC windows and select shutdown. Or course no hibernate for this Windows XP as well.
It took ~2 to 3GB of disk space from the Windows 7 system for the Windows XP virtual PC default installation, not including the additional software you going to install on the virtual PC.
Hope you will enjoy this post, subscribe to my RSS or mailing list or follow me on blogger or twitter. :)
source: I wrote this!
There are other methods to allow you to run the native Windows XP program:
1. Install Windows XP and Windows 7, and make the PC dual boot - Windows XP and Windows 7 co-exist on same system. However this will create quite a messy files system and I am not sure will it works.
2. You can also install virtual box on Windows 7 and then install the Windows XP. However you will need the original setup CD of Windows XP. Who would ever keep the Windows XP setup CD?
3. Buy a second hand system that come with Windows XP. Or install Windows XP on the old system, but need the original Windows XP setup CD as well.
Microsoft is kind enough to provide this Windows XP virtual [read: MS is not always so generous, okay]. Here are what to do:
1. Go to the virtual pc website of MS
http://www.microsoft.com/windows/virtual-pc/download.aspx
2. Choose to download for Windows XP virtual pc.
3. The website will need to verify if your Windows 7 is a legitimate, you will need to allow the download and execute this file "WindowsActivationUpdate.exe". I have to use IE to do this, using Chrome to download and execute taking forever (Probably MS purposely make it that way?).
4. After verification, it will bring you to the actual download page. There are 4 steps to follow, first step is to save that web page or print it for reference. I skipped the first step and jump to step 2 to step 4. :P
5. There are 3 files to download:
- Windows XP virtual PC (WindowsXPMode_N_en-us.exe) ~460MB.
- Virtual PC update (Windows6.1-KB958559-x64-RefreshPkg.msu) ~16MB
- WinXP virtual PC update (Windows6.1-KB977206-x64.msu) ~4MB
7. After restart your PC, time to run Windows XP virtual PC for first time.
a. Start -> All Programs -> Windows Virtual PC -> Windows XP Mode
8. You will have to wait a while for the first time because it will install the Windows XP.
a. Key in a password for the Windows XP virtual PC when it ask for it. Not needed to be same with your Windows 7 password.
9. After Windows XP boot up in virtual PC, you will able to see this. Note the BlueStacks gadget next to it. :D
10. The C drive and D drive in this virtual PC is not the same one on your Windows 7. They are virtual disk on this virtual PC. However your actual disks on Windows 7 should be link as a network disk in the virtual PC.
11. Go ahead and install the programs that you want to use in Windows 7.
Things to note: there are no shutdown option in this virtual Windows XP. Click on "Ctrl+Alt+Del" on the virtual PC windows and select shutdown. Or course no hibernate for this Windows XP as well.
It took ~2 to 3GB of disk space from the Windows 7 system for the Windows XP virtual PC default installation, not including the additional software you going to install on the virtual PC.
Hope you will enjoy this post, subscribe to my RSS or mailing list or follow me on blogger or twitter. :)
source: I wrote this!
Tuesday, December 13, 2011
Extend Windows desktop to 4 desktops
Why would someone extend a Windows desktop to 4 desktop? For those that used to Linux would know that that help to organize the Windows, you can put some jobs in one desktop and another jobs in another. By doing that you don't always have to look into every Windows just find the MS office or MathLab or Chrome.
I could put all personal web browsing in one desktop and work related Windows into another desktop. So when your boss drop by your cubicle, he/she would see your clean desktop with just work related stuffs. ;-)
There are a few similar software that have this kind of function. Today I would want to introduce Dexpot. It is free of charge for personal use.
It supports older version of Windows such as Windows 95, Windows 98, Windows ME and Windows NT4, but upto version 1.4 only.
It also have portable version, which I like it very much!
You can configure different wallpapers and screen saver for each desktop. However I didn't try the password. One Windows login password is enough, why want to have so many password? I would think this is very useful if you are sharing one computer with another person, there is no need to login and logout every time want to change user. Just use Dexpot to assign each Desktop to each user. By doing this it can be share with 4 persons!
There is a powerful component in Dexpot that automatically distribute the Windows into different Desktop. By configure it correctly, you can always make sure your facebook page is not same desktop with simulation windows.
There are many more features, but it would be super long post. So I leave it to you to explorer. :)
Dexpot download page
Hope you will enjoy this post, subscribe to my RSS or mailing list or follow me on blogger or twitter. :)
pix source: http://dexpot.de
Source: I wrote this!
I could put all personal web browsing in one desktop and work related Windows into another desktop. So when your boss drop by your cubicle, he/she would see your clean desktop with just work related stuffs. ;-)
There are a few similar software that have this kind of function. Today I would want to introduce Dexpot. It is free of charge for personal use.
It supports older version of Windows such as Windows 95, Windows 98, Windows ME and Windows NT4, but upto version 1.4 only.
It also have portable version, which I like it very much!
You can configure different wallpapers and screen saver for each desktop. However I didn't try the password. One Windows login password is enough, why want to have so many password? I would think this is very useful if you are sharing one computer with another person, there is no need to login and logout every time want to change user. Just use Dexpot to assign each Desktop to each user. By doing this it can be share with 4 persons!
There is a powerful component in Dexpot that automatically distribute the Windows into different Desktop. By configure it correctly, you can always make sure your facebook page is not same desktop with simulation windows.
There are many more features, but it would be super long post. So I leave it to you to explorer. :)
Dexpot download page
Hope you will enjoy this post, subscribe to my RSS or mailing list or follow me on blogger or twitter. :)
pix source: http://dexpot.de
Source: I wrote this!
Monday, November 14, 2011
Super fast find file for Windows
For most of the Windows users, they use the default "search" function on Windows to find their file. There are a few problems with it.
For older Windows, the search function just not doing the job right, meaning it cannot find the file I want, even though I gave the right keyword. This happen a lot during Windows XP time. So I use cygwin to search file.
For Windows 7, the search function become better and faster. Why it can become faster? It is because it keep on indexing all the files (including emails). The problem with this is that it create a huge index file on hard-disk Although hard-disk (non-solid-state type) are very cheap nowadays, no problem with Windows creating a Gig or two on a 500G or 1T hard-disk. But this will be a problem for solid-state type hard-disk, because solid-state hard-disk still very expensive. So in order to save the disk space on my laptop (I use solid-state hard-disk, hehe), I disable the indexing but search function become super slow.
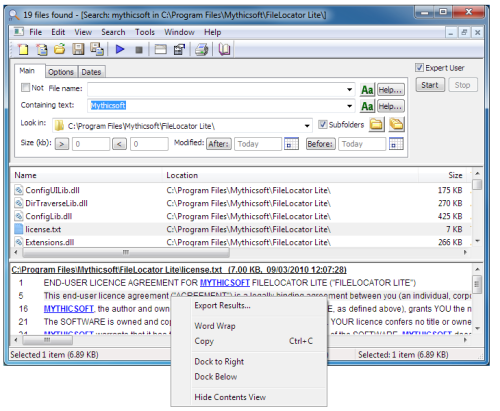
Luckily I found a software that search files as fast as Windows 7 search (with indexing turn on), but without the huge indexing file! Introducing FileLocator Lite. The same company also selling the pro version, named "FileLocator Pro", but this cost US$39!
Anyway, you can download the setup file for lite version here:
http://mythicsoft.com/Page.aspx?type=filelocatorlite&page=download
I found out the lite version is good enough for me for daily usage. Search with asterisk (*something*) always give me the right file. You can also search by modified, created, or last accessed date of a particular file(s).
Actually this software also called "Agent Ransack" but the name seems like not really suitable for work (NSFW), so the company compile the same code with different product name.
Hope you will enjoy this post, subscribe to my RSS or mailing list or follow me on blogger or twitter. :)
pix source: http://mythicsoft.com
source: I wrote this review!
Contact me for software review at: ahsiang888 at gmail dot com
For older Windows, the search function just not doing the job right, meaning it cannot find the file I want, even though I gave the right keyword. This happen a lot during Windows XP time. So I use cygwin to search file.
For Windows 7, the search function become better and faster. Why it can become faster? It is because it keep on indexing all the files (including emails). The problem with this is that it create a huge index file on hard-disk Although hard-disk (non-solid-state type) are very cheap nowadays, no problem with Windows creating a Gig or two on a 500G or 1T hard-disk. But this will be a problem for solid-state type hard-disk, because solid-state hard-disk still very expensive. So in order to save the disk space on my laptop (I use solid-state hard-disk, hehe), I disable the indexing but search function become super slow.
Luckily I found a software that search files as fast as Windows 7 search (with indexing turn on), but without the huge indexing file! Introducing FileLocator Lite. The same company also selling the pro version, named "FileLocator Pro", but this cost US$39!
Anyway, you can download the setup file for lite version here:
http://mythicsoft.com/Page.aspx?type=filelocatorlite&page=download
I found out the lite version is good enough for me for daily usage. Search with asterisk (*something*) always give me the right file. You can also search by modified, created, or last accessed date of a particular file(s).
Actually this software also called "Agent Ransack" but the name seems like not really suitable for work (NSFW), so the company compile the same code with different product name.
Hope you will enjoy this post, subscribe to my RSS or mailing list or follow me on blogger or twitter. :)
pix source: http://mythicsoft.com
source: I wrote this review!
Contact me for software review at: ahsiang888 at gmail dot com
Sunday, October 23, 2011
Windows 7 is the king now!
According to Stat Counter, Windows 7 take over the number 1 most people use OS recently. Only after 2 years it manage to take over Windows XP as the champion. Vista is just pathetic at 3rd place while Mac OS and Linux are steadily ramping up over the years. That is world wide data.
How about for Malaysia? Looks like Malaysia is ahead of the world wide that we use more Windows 7 at April of this year.
If you prefer, you can go to the interactive chart in the source link at end of this post and look for your country and region. You can even check for the market segment of web browsers and Mobile OS.
Hope you will enjoy this post, subscribe to my RSS or mailing list or follow me on blogger or twitter. :)
source: Stat Counter
How about for Malaysia? Looks like Malaysia is ahead of the world wide that we use more Windows 7 at April of this year.
One interesting chart is for Antarctica, it is very inconsistent. The reason I can think of is that this is a no-man land, only some scientists go there. So depend on the system that those few scientists use during that time, the OS change from time to time. Example from mid of 2010 to mid of this year, it is dominant by Win7, but at July alone it is dominate by Mac OS.
If you prefer, you can go to the interactive chart in the source link at end of this post and look for your country and region. You can even check for the market segment of web browsers and Mobile OS.
Hope you will enjoy this post, subscribe to my RSS or mailing list or follow me on blogger or twitter. :)
source: Stat Counter
Friday, September 23, 2011
My kind of Windows Explorer - Explorer++
If you are Windows user, regardless Windows XP, Windows Vista, Windows 7 or Windows 8 (anyone already on Windows 8???), you should have use Windows Explorer before. Even you always use "My Computer" to find the files, but it is actually Windows Explorer, just without the Folder view.
I use Windows Explorer a lot, both at work or at home. Copy files, move files, delete files, open files. And I use a few of Windows Explorer windows at any time, because I am too lazy to browse through the folder again every time I need to open it, so I just leave it. But that become very cluster, and messy with so many windows opened. So I start thinking if there is any multi-tab Windows Explorer? We have some many multi-tab web browsers, Firefox, Safari, Opera and IE also before multi-tab after some many years lack of this function after FF or Safari or Opera already have multi-tab.
Forget about web browsers, and there is a multi-tab Windows Explorer, but as always, it is not from Microsoft. But luckily this multi-tab Windows Explorer is a free software! Yeah!
Explorer++ (yes, it is Explorer with 2 plus symbols behind) can be come with installation version or portable version. This is another plus point, no installation! I have tried many file explorers, like Total Commander (need to pay), or some other which I forgot the names, because I simply switch back to use Windows Explorer after a few days of trying these file explorers. So you can know these file explorers are as bad as original Windows Explorer. :P
Because I am too lazy to take snapshot of Explorer++, so I just take the screenshots from it's website, hehe. And I will do some intro to the features of Explorer++.
Firstly, the view, it can be just like the original Windows Explorer, nothing much. Of course you can customize to add in more column in detail view, again, same like original Windows Explorer.
Second, it can show folder size at detail view. Don't this feature available
Third, you can change the attribute of files, again, same like Windows Explorer, but you can change the modification/creation/accessed date of each file. To do that, select the file(s) and then click "File" and then "Set File Attributes".
Forth, it can bookmark the folder that you want to open regularly.
And best of all, it is multi-tab, if you click on any of the picture above, you can already see the multi-tab. So no more messy with more than 10 Windows Explorer, because all of them can be open in muti-tab of Explorer++.
Okay, to get it, you can either get it from portableaps.com which will install the portable version for you.
http://portableapps.com/apps/utilities/explorerplusplus_portable
Or just download the zip version and unzip the files on your own. 64bits version available here. :)
http://www.explorerplusplus.com/download
The website:
http://www.explorerplusplus.com/home
Have a nice Sunday and a nice week ahead. :)
Hope you will enjoy this post, subscribe to my RSS or mailing list or follow me on blogger or twitter. :)
source: I wrote this, but pictures are from explorerplusplus website :P
p/s: submit your software/hardware/smartphone/tablet for review here, contact me at ahsiang888 at gmail.com. But be warned, I will write what ever is true if your stuffs really bad.
I use Windows Explorer a lot, both at work or at home. Copy files, move files, delete files, open files. And I use a few of Windows Explorer windows at any time, because I am too lazy to browse through the folder again every time I need to open it, so I just leave it. But that become very cluster, and messy with so many windows opened. So I start thinking if there is any multi-tab Windows Explorer? We have some many multi-tab web browsers, Firefox, Safari, Opera and IE also before multi-tab after some many years lack of this function after FF or Safari or Opera already have multi-tab.
Forget about web browsers, and there is a multi-tab Windows Explorer, but as always, it is not from Microsoft. But luckily this multi-tab Windows Explorer is a free software! Yeah!
Explorer++ (yes, it is Explorer with 2 plus symbols behind) can be come with installation version or portable version. This is another plus point, no installation! I have tried many file explorers, like Total Commander (need to pay), or some other which I forgot the names, because I simply switch back to use Windows Explorer after a few days of trying these file explorers. So you can know these file explorers are as bad as original Windows Explorer. :P
Because I am too lazy to take snapshot of Explorer++, so I just take the screenshots from it's website, hehe. And I will do some intro to the features of Explorer++.
Firstly, the view, it can be just like the original Windows Explorer, nothing much. Of course you can customize to add in more column in detail view, again, same like original Windows Explorer.
Second, it can show folder size at detail view. Don't this feature available
Third, you can change the attribute of files, again, same like Windows Explorer, but you can change the modification/creation/accessed date of each file. To do that, select the file(s) and then click "File" and then "Set File Attributes".
Forth, it can bookmark the folder that you want to open regularly.
And best of all, it is multi-tab, if you click on any of the picture above, you can already see the multi-tab. So no more messy with more than 10 Windows Explorer, because all of them can be open in muti-tab of Explorer++.
Okay, to get it, you can either get it from portableaps.com which will install the portable version for you.
http://portableapps.com/apps/utilities/explorerplusplus_portable
Or just download the zip version and unzip the files on your own. 64bits version available here. :)
http://www.explorerplusplus.com/download
The website:
http://www.explorerplusplus.com/home
Have a nice Sunday and a nice week ahead. :)
Hope you will enjoy this post, subscribe to my RSS or mailing list or follow me on blogger or twitter. :)
source: I wrote this, but pictures are from explorerplusplus website :P
p/s: submit your software/hardware/smartphone/tablet for review here, contact me at ahsiang888 at gmail.com. But be warned, I will write what ever is true if your stuffs really bad.
Wednesday, September 21, 2011
Free Angry Birds Rio For Windows - limited period - expired
This free download expire on September 29, 2011, just a few more days, go download it now!
Update: it is expire now, now it cost US$4.99 at Intel AppUp. However there are still a lot of free apps available at AppUp, I am trying a few of them now. :)
I only found out this recently, everyone can get Angry Birds Rio for Windows for Free! Thanks to Intel AppUp, if you register with Intel AppUp now, you can get Angry Birds Rio for your Windows XP and Windows 7, and it is completely free and also it is a legal download software, so no need to worry that is it illegal download or not. It didn't mention about Windows Vista though, but I think it should work as well.
What you need to do is go to Intel AppUp:
Intel AppUp
Download Intel AppUp and install it on your Windows.
Launch Intel AppUp, Click "Sign In" and then "Get one here" to create new account in a pop up windows, fill in name, email, password, and check on to agree terms and conditions blah blah blah, the trick is to stop at payment option registration.
Okay, now go back to the AppUp, sign in with email and password you registered just now, wait for it to sign in and download whatever needed to be download. You should able to find Angry Birds Rio for free on the AppUp. Click download and wait for it. Depend on your network/broadband, it will take a while since it is ~46MB.
Installation will begin automatically right after download completed. Wait for it to complete installation. And once it is done, click "Launch" on AppUp to start playing Angry Birds Rio! :D
Things to note:
1. Not sure you still can get Angry Birds Rio for free if you already register with Intel AppUp, but the FAQ did mention that we can register multiple account, meaning you can use another email to register, and get a-hem-a-hem this free Angry Birds Rio. :)
2.
Hope you will enjoy this post, subscribe to my RSS or mailing list or follow me on blogger or twitter. :)
source: Intel AppUp
p/s: I am lazy to take snapshot, just go download it now before expire!
Tuesday, September 6, 2011
Print Large Image to Multiple pages in Windows
I never thought of Windows can do this, yes, just Windows, and its default programs. No third party software, no need freeware or paidware. Just Windows. Surprisingly!
Yesterday I wanted to print a map on more than one pages (so that I get a bigger picture), so I tried my favourite image viewer see if it works, but somehow it don't have that option, too bad. Of course I can fire up my freeware Photoshop equivalent software, which is GIMP, and start splitting up the image to a few pieces and then print one by one. But that would take more time right? So I go to Google and Google it as usual.
And I did find the solution and no new software need to be install, just like that I said in the beginning of this post. Here is how:
1. Open the image that you want to print with Paint (Start -> Accessories -> Paint). Or copy the image and paste it on Paint once you have open it.
2. Select "Print" -> "Page Setup" (Windows 7 and Vista), or "File" -> "Page Setup" (Windows XP).
3. At "Scaling", select "Fit to" and then change the setting to "2" by "2" page(s ).
4. Click OK.
5. Print the image from Paint, make sure you select to print "All Pages".
That's it, you then can collect the print out from printer and merge them (with scissors and glue, to trim down the white spaces and stick them) if you want to. Also you can play with the print margin to reduce the white spaces as much as possible.
Of course it might take a few times to get use to it on the setting on step 3 showed above, but there is way avoid wasting papers, what would be another day to write on that, if I ever remember to write it. :P
Should apply to Windows XP, Windows Vista and Windows 7.
Hope you will enjoy this post, subscribe to my RSS or mailing list or follow me on blogger or twitter. :)
source: I wrote this!
Yesterday I wanted to print a map on more than one pages (so that I get a bigger picture), so I tried my favourite image viewer see if it works, but somehow it don't have that option, too bad. Of course I can fire up my freeware Photoshop equivalent software, which is GIMP, and start splitting up the image to a few pieces and then print one by one. But that would take more time right? So I go to Google and Google it as usual.
And I did find the solution and no new software need to be install, just like that I said in the beginning of this post. Here is how:
1. Open the image that you want to print with Paint (Start -> Accessories -> Paint). Or copy the image and paste it on Paint once you have open it.
2. Select "Print" -> "Page Setup" (Windows 7 and Vista), or "File" -> "Page Setup" (Windows XP).
3. At "Scaling", select "Fit to" and then change the setting to "2" by "2" page(s ).
4. Click OK.
5. Print the image from Paint, make sure you select to print "All Pages".
That's it, you then can collect the print out from printer and merge them (with scissors and glue, to trim down the white spaces and stick them) if you want to. Also you can play with the print margin to reduce the white spaces as much as possible.
Of course it might take a few times to get use to it on the setting on step 3 showed above, but there is way avoid wasting papers, what would be another day to write on that, if I ever remember to write it. :P
Should apply to Windows XP, Windows Vista and Windows 7.
Hope you will enjoy this post, subscribe to my RSS or mailing list or follow me on blogger or twitter. :)
source: I wrote this!
Thursday, July 28, 2011
Bins - Taskbar Organizer for Windows
What do you think about this picture?
Noticed there are 2 groups of taskbar icons? Nice? I can group even more groups, just that I don't think I have too many taskbar now after moving all the browsers into one group.
This software is made by the people that made ObjectDock, DellDock, and Fences. Bins is the software.
Unfortunately, it works for Windows 7 only (all version). Sorry for Windows XP and Vista.
After you install it and proper setup done, just drag the taskbar to the another that you want to group them. If you wish to un-group one of them, just drag it out of the group. That's it, very simple!
And since it is beta, so do expect some bugs.
And now my taskbar is much more cleaner because I always open more than 20 applications at same time.
Where can you get it?
Bins
Get it now, because it is still in beta and it is free! So be fast.
I think they will start charging when it goes to official release.
Hope you will enjoy this post, subscribe to my RSS or mailing list or follow me on blogger or twitter. :)
source: I wrote this
Noticed there are 2 groups of taskbar icons? Nice? I can group even more groups, just that I don't think I have too many taskbar now after moving all the browsers into one group.
This software is made by the people that made ObjectDock, DellDock, and Fences. Bins is the software.
Unfortunately, it works for Windows 7 only (all version). Sorry for Windows XP and Vista.
After you install it and proper setup done, just drag the taskbar to the another that you want to group them. If you wish to un-group one of them, just drag it out of the group. That's it, very simple!
And since it is beta, so do expect some bugs.
And now my taskbar is much more cleaner because I always open more than 20 applications at same time.
Where can you get it?
Bins
Get it now, because it is still in beta and it is free! So be fast.
I think they will start charging when it goes to official release.
Hope you will enjoy this post, subscribe to my RSS or mailing list or follow me on blogger or twitter. :)
source: I wrote this
Friday, March 4, 2011
What is Problem Steps Recorder?
A picture is worth a thousand words. This is always true and cannot be more true. :D
Say what if you have software or hardware problem on your Windows 7 system but the more you explain, the audience just could not understand what you mean. The audience could be your IT guy, or your buddy, or your bf/gf/family who trying to help from other end but just could not understand your problem.
You can either make a video of it, but it might be too complicated for most of the people. And you need to find a software for that. So how?
Fear not, Windows 7 now come with a tool call "Problem Steps Recorder" (I call it PSR from now on).
So whenever you have a problem, launch the PSR. [Windows start button then type "PSR" in the "Search programs and files" box, next select psr.exe or "Record steps to reproduce a problem"]
When the tool appears (image showed above), click "Start Record". It might advise you to run it as administrator, just click okay to proceed. [use it in case you have problem recording program that run with administrator permission. Personally I haven't find any problem by not running with administrator. ]
Now start reproducing the problem you have. PSR will record each of the click you performed. You will notice there is a small red dot blink whenever you click.
Click "Stop Record" when you are done. It will ask where do you want to keep the zip file, select your path and file name and then click OK. The zip file actually contains the .mht file.
To review your .mht file, unzip it and double click it, your browser should be able to view the file. You can see the snapshot (print screen) of the clicks you performed. Click on the picture will bring up bigger picture.
There is a text box below that recorded additional details of the clicks.
PSR is very useful for training. If you have to show/train people on a software or task, you can use PSR to record the steps and share it to whoever that wanted to know. Ask the person to get back to you only if they still have question. If your PSR is detail enough, I think you can saved a lot of time from showing/train/explain the same thing to different person.
More info here: [link]
Hope you will enjoy this post, subscribe to my RSS or mailing list or follow me on blogger or twitter. :)
Source: internet
Say what if you have software or hardware problem on your Windows 7 system but the more you explain, the audience just could not understand what you mean. The audience could be your IT guy, or your buddy, or your bf/gf/family who trying to help from other end but just could not understand your problem.
You can either make a video of it, but it might be too complicated for most of the people. And you need to find a software for that. So how?
Fear not, Windows 7 now come with a tool call "Problem Steps Recorder" (I call it PSR from now on).
So whenever you have a problem, launch the PSR. [Windows start button then type "PSR" in the "Search programs and files" box, next select psr.exe or "Record steps to reproduce a problem"]
When the tool appears (image showed above), click "Start Record". It might advise you to run it as administrator, just click okay to proceed. [use it in case you have problem recording program that run with administrator permission. Personally I haven't find any problem by not running with administrator. ]
Now start reproducing the problem you have. PSR will record each of the click you performed. You will notice there is a small red dot blink whenever you click.
Click "Stop Record" when you are done. It will ask where do you want to keep the zip file, select your path and file name and then click OK. The zip file actually contains the .mht file.
To review your .mht file, unzip it and double click it, your browser should be able to view the file. You can see the snapshot (print screen) of the clicks you performed. Click on the picture will bring up bigger picture.
There is a text box below that recorded additional details of the clicks.
PSR is very useful for training. If you have to show/train people on a software or task, you can use PSR to record the steps and share it to whoever that wanted to know. Ask the person to get back to you only if they still have question. If your PSR is detail enough, I think you can saved a lot of time from showing/train/explain the same thing to different person.
More info here: [link]
Hope you will enjoy this post, subscribe to my RSS or mailing list or follow me on blogger or twitter. :)
Source: internet
Thursday, February 10, 2011
Windows 7 Theme for Valentine
To make you Windows 7 looks more romantic for this Valentine, download these Windows 7 theme.
Lovebirds themepack
LacyHearts themepack
Hope you will enjoy this post, subscribe to my RSS or mailing list or follow me on blogger or twitter. :)
Source: microsoft
Lovebirds themepack
LacyHearts themepack
Hope you will enjoy this post, subscribe to my RSS or mailing list or follow me on blogger or twitter. :)
Source: microsoft
Tuesday, February 8, 2011
Windows 7 Theme for Year of Rabbit
If you just back to work from CNY break and find out your Windows 7 at your work desktop/laptop is super dull, here is something to make it looks nice and updated!
Download the Microsoft Year of Rabbit Windows 7 Theme into your desktop/laptop :)
First one is some photos of Rabbit, very cute!
Go to this link and click download.
Second one is the cartoonized rabbit by Huang, Yun Hsien:
Go to this link and click download.
Hope you will enjoy this post, subscribe to my RSS or mailing list or follow me on blogger or twitter. :)
Source: Microsoft
Download the Microsoft Year of Rabbit Windows 7 Theme into your desktop/laptop :)
First one is some photos of Rabbit, very cute!
Go to this link and click download.
Second one is the cartoonized rabbit by Huang, Yun Hsien:
Go to this link and click download.
Hope you will enjoy this post, subscribe to my RSS or mailing list or follow me on blogger or twitter. :)
Source: Microsoft
Monday, January 24, 2011
How do I disable zip folders in Windows 7?
I have not being posting any tutorial for a long long time, in fact I forgot which one was it the last one. :P Anyway you still can find it here.
Okay back to today's topic, if you are using Windows 7 (any version), you do notice that the zip files (and cab files) are being listed as a folder in Windows Explorer. Although some find it useful, I find it very annoying, because it make the folders tree looks clustered, just simply annoying. So if you want to disable it, here is what you can do.
Note: back up your registry first.
Okay here we go (You can delete directly for Windows Vista and do a reboot without the steps below):
The following two (2) keys need to be deleted fromthe registry:
For zip files delete the regkey
HKEY_CLASSES_ROOT\CLSID\{E88DCCE0-B7B3-11d1-A9F0-00AA0060FA31}
For cab files delete
HKEY_CLASSES_ROOT\CLSID\{0CD7A5C0-9F37-11CE-AE65-08002B2E1262}
When you try to delete them, you will almost certainly get an "access denied" or "failed" type of message. Before you can delete them, you need to change the permissions/ownership of these two keys. Here is how to do it:
01 - open regedit from the RUN console
02 - navigate to the first key that needs to be deleted (HKEY_CLASSES_ROOT\CLSID\{E88DCCE0- B7B3-11d1-A9F0-00AA0060FA31})
03 - right click on the key and select "Permissions"
04 - click on "Advanced"
05 - click on the "Ownership" tab
06 - in the "change owner to" section, highlight your username
07 - check the box for "replace owner on subcontainers and objects"
08 - click on "Apply"
09 - Click "OK"
10 - Under "Security" tab, highlight your username and check the box for "Allow Full Control" (located mid-menu in the "Permissions For Administrators" section)
11 - click "Apply" and "OK"
12 - you can now delete the registry key. MAKE SURE YOU ARE ON THE CORRECT KEY!
13 - repeat the process for the 2nd key.
14 - reboot (changes will NOT take effect until you reboot
15 - VOILA! NO MORE ZIP FOLDERS! woohoo!
16 - thanks to the original solvers of this problem, whomever they may be.
Have a nice week ahead!
Hope you will enjoy this post, subscribe to my RSS or mailing list or follow me on blogger or twitter. :)
Source: social.technet.microsoft.com
Okay back to today's topic, if you are using Windows 7 (any version), you do notice that the zip files (and cab files) are being listed as a folder in Windows Explorer. Although some find it useful, I find it very annoying, because it make the folders tree looks clustered, just simply annoying. So if you want to disable it, here is what you can do.
Note: back up your registry first.
Okay here we go (You can delete directly for Windows Vista and do a reboot without the steps below):
The following two (2) keys need to be deleted fromthe registry:
For zip files delete the regkey
HKEY_CLASSES_ROOT\CLSID\{E88DCCE0-B7B3-11d1-A9F0-00AA0060FA31}
For cab files delete
HKEY_CLASSES_ROOT\CLSID\{0CD7A5C0-9F37-11CE-AE65-08002B2E1262}
When you try to delete them, you will almost certainly get an "access denied" or "failed" type of message. Before you can delete them, you need to change the permissions/ownership of these two keys. Here is how to do it:
01 - open regedit from the RUN console
02 - navigate to the first key that needs to be deleted (HKEY_CLASSES_ROOT\CLSID\{E88DCCE0- B7B3-11d1-A9F0-00AA0060FA31})
03 - right click on the key and select "Permissions"
04 - click on "Advanced"
05 - click on the "Ownership" tab
06 - in the "change owner to" section, highlight your username
07 - check the box for "replace owner on subcontainers and objects"
08 - click on "Apply"
09 - Click "OK"
10 - Under "Security" tab, highlight your username and check the box for "Allow Full Control" (located mid-menu in the "Permissions For Administrators" section)
11 - click "Apply" and "OK"
12 - you can now delete the registry key. MAKE SURE YOU ARE ON THE CORRECT KEY!
13 - repeat the process for the 2nd key.
14 - reboot (changes will NOT take effect until you reboot
15 - VOILA! NO MORE ZIP FOLDERS! woohoo!
16 - thanks to the original solvers of this problem, whomever they may be.
Have a nice week ahead!
Hope you will enjoy this post, subscribe to my RSS or mailing list or follow me on blogger or twitter. :)
Source: social.technet.microsoft.com
Wednesday, January 12, 2011
Speed up Windows 7 booting time
You will be surprise on the items loaded during boot up of your Windows 7 (or any other Windows). Using this autoruns apps from live.sysinternal.com
http://technet.microsoft.com/en-us/sysinternals/bb963902.aspx
You can run it directly from the web or download it and run it from your local hard drive.
Please note this: clean up the Logon, Sidebar Gadgets and Scheduled Tasks tabs only, do not change/delete other items in other tabs unless you know what you doing. The reason is your might break Windows and end up re-installation the Windows.
Also run it as administrator, use with cautions, I do not responsible if anything happen to your Windows and you! :)
Hope you will enjoy this post, subscribe to my RSS or mailing list or follow me on blogger or twitter. :)
Source:
http://technet.microsoft.com/en-us/sysinternals/bb963902.aspx
You can run it directly from the web or download it and run it from your local hard drive.
Please note this: clean up the Logon, Sidebar Gadgets and Scheduled Tasks tabs only, do not change/delete other items in other tabs unless you know what you doing. The reason is your might break Windows and end up re-installation the Windows.
Also run it as administrator, use with cautions, I do not responsible if anything happen to your Windows and you! :)
Hope you will enjoy this post, subscribe to my RSS or mailing list or follow me on blogger or twitter. :)
Source:
Subscribe to:
Posts (Atom)